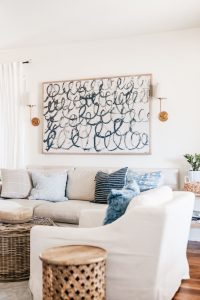
Are you looking for creative ways to spruce up your living room? Well, look no further! In this article, we will explore the wonderful world of DIY wall art and how you can easily incorporate it into your living room design. Whether you’re a seasoned artist or a beginner, there are countless ways to add a personalized touch to your space. From hand-painted canvases to repurposed materials, the possibilities are endless. Get ready to unleash your inner artist and transform your living room into a masterpiece!
Choosing the Right Wall Art
When it comes to designing your living room, choosing the right wall art is essential. It can bring personality, color, and style to your space, making it truly feel like home. Consider the theme and style of your living room when selecting wall art. Take into account your existing furniture, color scheme, and overall aesthetic. Whether your living room has a modern, minimalist vibe or a cozy, rustic feel, there is wall art out there that will complement your space perfectly.
Determining the size and scale of the artwork is another crucial aspect. You don’t want your wall art to overpower the room or get lost in the background. Measure your wall and consider the available space before making your selection. A large, bold piece can make a statement in a spacious living room, while a smaller, more delicate artwork may be suitable for a cozy corner.
Consider the color palette of your living room when choosing wall art. You want the colors to harmonize with the rest of the space. Decide whether you want the artwork to blend in or stand out as a focal point. Look for colors that complement your existing furniture and accent pieces.
The placement of the artwork is also important. Different wall art pieces can elicit different emotions depending on where they are placed in the room. If you want to create a calming ambiance, consider placing artwork above a seating area or a television. On the other hand, if you want to make a bold statement, you can hang artwork on a prominent wall that catches the eye as soon as you enter the room. Experiment with different placements to find the perfect spot for your wall art.
Exploring Different DIY Wall Art Ideas
DIY wall art offers a great way to personalize your living room while unleashing your creativity. There are countless ideas and techniques to explore, ensuring that you find the perfect match for your style and preferences.
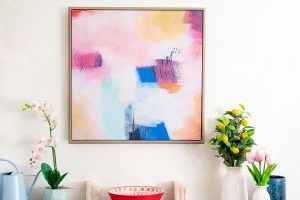
Canvas painting is a classic DIY wall art idea, perfect for those who enjoy working with paint and brushes. You can create abstract or realistic paintings that reflect your personality and artistic style. Use a blank canvas as your canvas and let your imagination run wild.
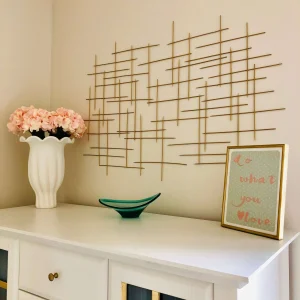
Abstract wall art is a popular choice for modern living rooms. This style of art focuses on shapes, colors, and textures rather than depicting recognizable objects. Whether you choose to use acrylic pouring techniques, create geometric shapes, or experiment with different textures, abstract wall art can add a contemporary touch to your space.
Typography and quotes are another way to incorporate DIY wall art into your living room. Choose meaningful quotes or inspirational phrases that resonate with you. You can use stencils to create clean and precise lettering or experiment with different fonts and sizes. Typography wall art can serve as a daily reminder of your goals and values.
Collages and photo displays allow you to showcase your favorite memories and moments. Create collages by arranging photographs, tickets, letters, or other meaningful items on a large canvas or poster board. Alternatively, consider creating a photo wall using frames of different sizes and shapes. This adds a personal touch to your living room and sparks conversations when guests visit.
Macrame and textile art have gained popularity in recent years. You can create stunning wall hangings using various knots and patterns with rope, yarn, or fabric strips. This bohemian-inspired DIY wall art adds warmth, texture, and a touch of nature to your living room.
Wall hangings and tapestries can instantly transform a plain wall into a statement piece. Explore different patterns, colors, and materials to find the perfect fit for your living room. From intricate tapestries with vibrant designs to macramé hangings with delicate fringes, this type of DIY wall art creates a cozy and inviting atmosphere.
If you enjoy working with paper, paper crafts and origami are excellent choices for DIY wall art. Fold colorful papers into beautiful origami shapes, such as flowers, birds, or geometric figures, and create a unique display on your wall. Paper crafts can also include large-scale paper sculptures or intricate cut-out designs.
DIY artwork using natural materials adds an organic and earthy vibe to your living room. Incorporate elements like dried flowers, leaves, shells, or driftwood into your wall art projects. You can create stunning botanical arrangements or nature-inspired collages that bring the outdoors inside.
Upcycling and repurposing have become increasingly popular in the world of DIY wall art. Give new life to old items by transforming them into unique artworks. For example, you can repurpose old windows, doors, or wooden crates as canvas or frames. By upcycling and repurposing, you not only create one-of-a-kind pieces but also contribute to a more sustainable lifestyle.
Personalized wall art allows you to showcase your own interests, passions, and experiences. Whether it’s a hand-painted portrait, a wooden sign with your family name, or a custom-made artwork that incorporates your favorite hobbies, personalized wall art adds a touch of uniqueness to your living room. It’s an opportunity to make your space truly your own.
Creating DIY Wall Art on a Budget
Creating DIY wall art doesn’t have to break the bank. With a little creativity and resourcefulness, you can produce stunning pieces without spending a fortune. Here are some tips for creating DIY wall art on a budget:
- Utilize recyclable or low-cost materials. Look around your home for items that can be repurposed or transformed into art. Consider using old magazines, newspapers, fabric scraps, or even cardboard as your canvas or base.
- Repurpose and upcycle existing items. Take a look at items that you no longer use or that are worn out. Can you give them new life as wall art? Transform an old paint palette into a unique piece or repurpose a vintage picture frame to showcase a favorite quote.
- Get creative with DIY techniques. Experiment with different mediums and techniques that don’t require expensive materials. For example, try watercolor painting, paper cutting, or decoupage using inexpensive materials like tissue paper or napkins.
- Explore thrift stores and flea markets. Thrift stores and flea markets are treasure troves for finding affordable artwork or materials to use for your DIY projects. Look for frames, canvases, or paintings that you can repurpose or modify to fit your style.
- Printable art and free printables. There is a wealth of printable art available online, ranging from abstract designs to vintage illustrations. Simply download, print, and frame these artworks to instantly add a personal touch to your living room.
- Collaborate with friends and local artists. Consider organizing art swap events with friends or reaching out to local artists for collaborations. This allows you to exchange or acquire unique pieces without spending a lot of money.
- Replicating high-end artwork on a budget. If you have your eye on a high-end artwork but can’t afford the price tag, consider replicating it yourself. Study the techniques and materials used, and recreate the piece within your budget.
- Using frames and matting strategically. Frames and matting can elevate DIY wall art and make it appear more polished. Look for affordable frames or consider purchasing second-hand frames and repainting them to fit your style.
- Incorporating DIY gallery walls. Gallery walls are a great way to display a collection of smaller DIY artworks. Mix and match different styles, sizes, and mediums to create a visually striking gallery wall that enhances the atmosphere of your living room.
By being resourceful and thinking outside the box, you can create stunning DIY wall art on a budget that reflects your personal style and adds personality to your living room.
Customizing the DIY Wall Art
One of the best things about DIY wall art is the ability to customize it according to your preferences and personal touch. Here are some ideas to personalize your DIY wall art and make it truly your own:
- Personalize with monograms or initials. Incorporate your or your family members’ initials or monograms into your wall art pieces. Whether it’s a painted initial on a canvas or a wooden monogram mounted on a backdrop, this customization adds a personal touch.
- Incorporate family photos or portraits. Use your own photographs or family portraits to create meaningful wall art. Framed pictures or a photo collage can remind you and your loved ones of special memories and create a sense of warmth and nostalgia in your living room.
- Add inspirational quotes or messages. Customize your DIY wall art with inspirational quotes or messages that hold special meaning to you. Use stencils, decals, or even hand-paint letters to add these uplifting sentiments to your living room walls.
- Experiment with different textures and materials. Play with textures and materials to create depth and interest in your DIY wall art. Incorporate fabrics, ribbons, beads, or even natural elements like shells or pebbles to add unique textures to your artwork.
- Explore layering techniques for dimension. Layering different elements or materials can add dimension to your DIY wall art. Experiment with paper cut-outs, fabric overlays, or even three-dimensional objects to create visually captivating pieces.
- Use stencils and stamps. Stencils and stamps are versatile tools that can help you achieve precise patterns and designs. Consider using them to create intricate details or to add your own artistic flair to your DIY wall art.
- Add a splash of color with paint. Paint can transform any DIY wall art piece. Experiment with different color schemes and techniques, such as ombre effects or color blocking, to add vibrancy and personality to your living room walls.
- Integrating natural elements. Bring the outside in by incorporating natural elements into your DIY wall art. Consider using dried flowers, leaves, feathers, or even pressed plants to add a touch of nature to your living room.
- Adding LED lights or backlighting. Adding LED lights or backlighting can bring a sense of magic and ambiance to your DIY wall art. Consider placing string lights behind a canvas or using backlighting to highlight certain aspects of your artwork.
- Incorporate interactive elements. Create DIY wall art that invites interaction from guests or family members. This could include a chalkboard wall where people can write and draw, a gallery wall with movable frames, or even a wall-mounted puzzle that can be assembled.
By customizing your DIY wall art, you can ensure that it truly reflects your personality, interests, and the overall vibe of your living room.
Arranging and Hanging DIY Wall Art
Once you have created your DIY wall art, it’s time to arrange and hang it in your living room. The way you arrange and display your art can greatly impact the overall aesthetic and atmosphere of the room. Consider the following tips for arranging and hanging DIY wall art:
- Choose the right wall for each artwork. Assess different walls in your living room and determine which one will serve as the best backdrop for each piece. Consider the size, style, and colors of the artwork when selecting the appropriate wall.
- Experiment with different layouts. Don’t be afraid to try out different arrangements and layouts before settling on the final one. Utilize the floor or a large table to arrange your art pieces and experiment with various configurations.
- Use templates or guides for symmetry. If you prefer a more symmetrical arrangement, consider using templates or guides to help you achieve balance and precision. Cut out paper or cardboard templates in the shape and size of your art pieces and arrange them on the wall before making any holes.
- Consider the height and proportions. When hanging your DIY wall art, consider the height and proportions of the room. Hang larger pieces at eye level or slightly above furniture to create a balanced composition. For smaller pieces or groupings, consider creating visual clusters at varying heights.
- Create a gallery wall. A gallery wall is an excellent option if you have multiple pieces of DIY wall art to display. Mix and match different sizes, styles, and mediums to create a visually striking gallery wall that showcases your creativity.
- Merging DIY artwork with existing decor. Consider how your DIY wall art will blend with your existing decor. Take into account the furniture, accessories, and colors in the room to ensure that your art pieces complement the overall aesthetic.
- Anchor the artwork with furniture or shelves. To create a cohesive look, consider anchoring your DIY wall art with furniture or shelves. Hang artwork above a sofa or console table to create a harmonious connection between the two elements.
- Add depth with layered pieces. Layering different pieces of DIY wall art can add depth and visual interest to your living room. Consider overlapping frames, canvases, or even textured pieces to create a dimensional effect.
- Incorporate mirrors and reflective surfaces. Mirrors and reflective surfaces can add a sense of spaciousness and light to your living room. Consider hanging a mirror near your DIY wall art to create an illusion of a larger space and to reflect the artwork.
- Properly secure and hang the artwork. Make sure to properly secure, hang, and display your DIY wall art to ensure its longevity. Use appropriate hardware, such as picture hooks or wall anchors, and follow the manufacturer’s instructions for weight limits.
Arranging and hanging your DIY wall art requires thoughtfulness and creativity. Experiment with different layouts, heights, and arrangements until you find the perfect placement that enhances the overall aesthetic of your living room.
Maintaining and Updating DIY Wall Art
Taking care of your DIY wall art is essential to ensure its longevity and preserve its beauty. Here are some tips for maintaining and updating your DIY wall art over time:
- Regular cleaning and dusting. Just like any other decor pieces, your DIY wall art will accumulate dust and dirt over time. Regularly clean and dust your artwork using a soft cloth or a duster to keep it looking fresh and vibrant.
- Protecting the artwork from moisture and sunlight. Exposure to moisture and direct sunlight can cause damage and fading to your DIY wall art. Hang your artwork away from windows or areas where it may be exposed to excessive sunlight or humidity.
- Replacing or refreshing the artwork over time. As your tastes and styles evolve, you may feel the need to replace or refresh your DIY wall art. Don’t be afraid to take down pieces that no longer resonate with you and replace them with new creations that better reflect your current style.
- Rotating or swapping the wall art. Another way to keep your living room fresh and dynamic is by rotating or swapping your wall art. Consider changing the artwork seasonally or whenever you feel like giving your space a new look.
- DIY upgrades and modifications. If you feel that your DIY wall art needs a little boost or update, consider making DIY upgrades and modifications. This could involve adding new elements, repainting or repositioning certain parts, or incorporating additional layers or textures.
- Renewing the frames or mounting. Frames and mountings can become worn out or outdated over time. Consider renewing or updating the frames or mounting techniques to give your DIY wall art a refreshed and polished appearance.
- Restoring damaged or faded pieces. If you have DIY wall art that has been damaged or faded, consider restoring them to their former glory. This could involve repainting, repairing, or replacing certain elements to restore the original beauty of the piece.
- Repositioning the artwork. Don’t be afraid to experiment with repositioning your DIY wall art. Moving an artwork to a different wall or changing its position within a room can rejuvenate its impact and give it new life.
- Adding new elements to the existing art. If you have existing DIY wall art that you still love, consider adding new elements to enhance or complement it. This could involve adding small accents, incorporating new textures, or introducing additional layers to the piece.
- Incorporating seasonal and holiday themes. Another way to update your DIY wall art is by incorporating seasonal or holiday themes. Consider adding elements that reflect the current season or holidays to give your living room a festive and fresh vibe.
By regularly maintaining and updating your DIY wall art, you can keep your living room looking fresh and dynamic. These small changes can make a big difference in the overall atmosphere and appearance of your space.
Styling Tips for a Harmonious Living Room
Incorporating DIY wall art into your living room design requires thoughtful styling to create a harmonious and cohesive look. Here are some styling tips to consider:
- Consider the color scheme and mood. When designing your living room, consider the color scheme and the overall mood you want to create. Use your DIY wall art to enhance or complement the existing colors and evoke the desired atmosphere.
- Balance the artwork with other decor. Avoid overwhelming your living room with too many art pieces. Strike a balance between your DIY wall art and other decor elements, such as furniture, rugs, and accessories, to create a well-rounded and visually pleasing space.
- Create visual flow and cohesion. Your DIY wall art should flow seamlessly with the rest of the room. Consider the style, colors, and themes of your existing decor and choose DIY wall art that complements and enhances the overall aesthetic.
- Incorporate different shapes and sizes. Embrace diversity in your DIY wall art by incorporating different shapes and sizes. Mix and match rectangular, circular, and abstract pieces to create visual interest and dynamic arrangements.
- Use artwork to highlight focal points. Use your DIY wall art strategically to highlight focal points in your living room. Hang artwork above a fireplace, mantel, or a statement piece of furniture to draw attention and create a striking visual impact.
- Maintain a coherent theme or story. Create a cohesive and meaningful living room by maintaining a coherent theme or story with your DIY wall art. Whether it’s a specific style, era, or artistic technique, your wall art should contribute to the narrative of your space.
- Layer the artwork with textiles and rugs. Add depth and texture to your living room by layering your DIY wall art with textiles and rugs. Consider hanging wall art above a textured tapestry or placing it on a wall behind a cozy fabric-upholstered sofa.
- Lighting for enhancing the art. Proper lighting is essential for showcasing your DIY wall art. Use a combination of natural and artificial lighting to highlight the artwork and create a captivating ambiance in your living room.
- Consider the surrounding architecture. Take into account the architectural elements of your living room when styling your DIY wall art. Consider the shape of windows, arches, or nooks to create a well-balanced composition that works cohesively with the surrounding space.
- Adding plant life for freshness. Incorporating plants and greenery into your living room can breathe life into your DIY wall art. Place potted plants or hanging planters near your artwork to create a fresh and vibrant atmosphere.
By following these styling tips, you can create a harmonious and visually appealing living room design that showcases your DIY wall art and reflects your personal style.
Seeking Inspiration and Ideas
When it comes to DIY wall art, seeking inspiration and ideas is key to unleashing your creativity. Here are some sources where you can find inspiration for your living room design:
- Online platforms and social media. Online platforms such as Pinterest, Instagram, and DIY blogs are treasure troves for DIY wall art inspiration. Browse through thousands of creative ideas, tutorials, and photographs to find inspiration that resonates with you.
- Interior design magazines and books. Traditional sources such as interior design magazines and books are excellent for finding inspiration and learning about the latest trends. Flip through the pages and take note of any DIY wall art ideas that catch your eye.
- Home decor blogs and websites. Home decor blogs and websites often feature DIY projects and provide step-by-step instructions, making them great sources of inspiration. Explore different blogs and websites specializing in DIY home decor to gather ideas for your living room.
- Art exhibitions and galleries. Visiting art exhibitions and galleries can provide a wealth of inspiration for your DIY wall art. Take note of different artistic styles, techniques, and mediums that appeal to you and use them as a starting point for your projects.
- Visiting artist studios. Engaging with local artists and visiting their studios can provide a unique perspective and inspiration for your DIY wall art. Observe their creative process, ask questions, and explore their artworks to gain insights into different techniques and styles.
- DIY craft workshops and classes. Participating in DIY craft workshops and classes can be a fun and interactive way to gather inspiration. Learn new techniques, experiment with different materials, and exchange ideas with fellow crafters to expand your creative horizons.
- Creative and crafty friends. Don’t underestimate the inspiration you can gain from your creative and crafty friends. Share ideas, collaborate on projects, and exchange tips to ignite your imagination and come up with unique DIY wall art concepts.
- Nature and natural landscapes. Take a break from technology and immerse yourself in nature. The colors, shapes, and textures found in natural landscapes can inspire your DIY wall art. Take photographs, collect leaves or flowers, and incorporate these elements into your projects.
- Travel and cultural experiences. Traveling and experiencing different cultures can be a rich source of inspiration for DIY wall art. Explore local markets, visit museums, or immerse yourself in the vibrant street art of different cities to find unique ideas for your living room.
- Exploring different art styles. Explore different art styles and periods to broaden your creative horizons. From Renaissance classics to abstract expressionism and street art, each style offers unique techniques and aesthetics that can inspire your DIY wall art projects.
By seeking inspiration and ideas from various sources, you can expand your creativity and develop unique DIY wall art that truly reflects your personal style and interests.
Final Thoughts
Incorporating DIY wall art into your living room design allows you to personalize your space, express your creativity, and transform your living room into a reflection of your personality. With so many ideas to explore and techniques to try, the possibilities are truly endless. Whether you choose canvas painting, abstract art, or personalized pieces, remember to consider the theme and style of your living room, determine the size and scale of the artwork, and carefully choose the color palette. Additionally, experiment with different layouts, customize your wall art to make it more unique, and consider the overall styling and arrangement in your living room. By following these tips and seeking inspiration from various sources, you can create DIY wall art that adds meaning, beauty, and character to your living space. So let your creativity soar and embark on a journey to create a harmonious and inviting atmosphere in your living room through the power of DIY wall art.