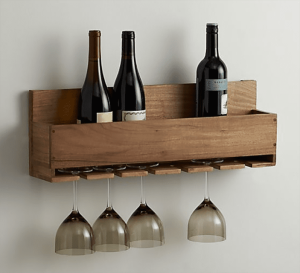
Have you ever dreamed of having your own wine rack in your kitchen, showcasing your impressive collection and adding a touch of sophistication to the space? Building a DIY wine rack might seem like a daunting task, but fear not! In this article, we will guide you through the step-by-step process of creating your very own wine rack, tailored to fit your kitchen and personal style. Whether you’re a seasoned DIY enthusiast or a beginner looking to try your hand at woodworking, these easy-to-follow steps will have you sipping wine in no time. So grab your tools, get ready to unleash your creativity, and let’s start building that dream wine rack together! Building a DIY wine rack for your kitchen can be a fun and rewarding project. Not only does it offer a practical storage solution for your wine collection, but it also adds a touch of elegance and sophistication to your kitchen decor. To successfully create your own wine rack, you will need several materials and follow a step-by-step process. So, let’s dive into the details and learn how to build your very own DIY wine rack!
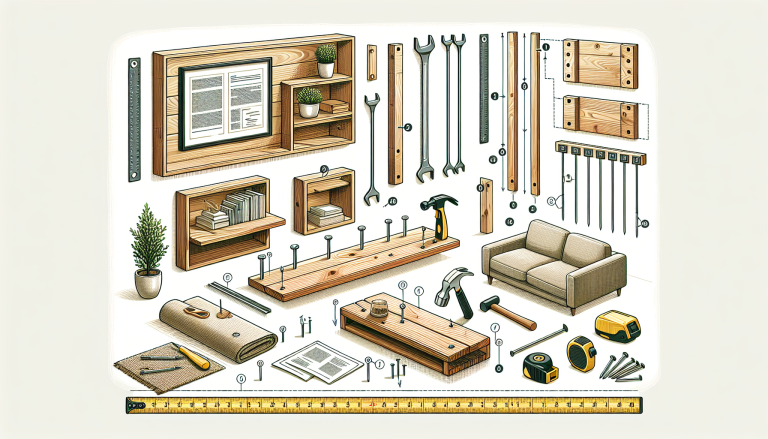
Materials Needed

Before starting your DIY wine rack project, gather all the necessary materials. Here’s a list of what you’ll need:
1. Wooden boards:
Wooden boards will form the structure of your wine rack, providing stability and support for your wine bottles and glasses.
2. Measuring tape:
Accurate measurements are crucial to ensure that your wine rack fits perfectly in your desired location.
3. Saw:
A saw will be used to cut the wooden boards to the required dimensions. Choose a saw that suits your comfort and skill level.
4. Sandpaper:
To ensure a smooth and polished finish, sandpaper is essential for removing rough edges and splinters.
5. Nail gun or screws:
Depending on your preference and the type of wood used, you can secure the pieces together with either a nail gun or screws.
6. Wood glue:
Wood glue provides additional reinforcement, ensuring that your wine rack is sturdy and durable.
7. Level:
A level will help you ensure that your wine rack is perfectly straight and properly aligned.
8. Drill:
A drill will be needed to create holes for screws or other mounting hardware.
9. Screwdriver:
You’ll need a screwdriver to insert and tighten screws during the assembly process.
10. Stain or paint (optional):
If you want to enhance the aesthetics of your wine rack, you can apply a stain or paint of your choice to match your kitchen decor.
Now that you have all the necessary materials, let’s move on to the step-by-step process of building your own DIY wine rack!
Step 1: Measuring and Planning
Before diving into construction, take some time to measure and plan your wine rack.
Determine the dimensions:
Measure the available space in your kitchen where you intend to install the wine rack. Consider both height and width to ensure a perfect fit.
Choose the location:
Decide on the ideal location for your wine rack. It could be a wall, an empty corner, or even the backside of a cabinet door. Make sure it is easily accessible and complements the overall kitchen design.
Account for wine bottle sizes:
Consider the dimensions of the standard wine bottles you plan to store. Ensure that the measurements of your wine rack accommodate these bottle sizes.
Consider how many bottles you want to store:
Determine the approximate number of wine bottles you wish to store in your rack. This will help you determine the size and capacity needed.
Sketch a rough design:
Using a pen and paper, create a rough sketch of your wine rack design. This will help you visualize the final product and guide you during the construction process.
Step 2: Cutting and Sanding
With your plan in place, it’s time to start working on the wooden boards.
Measure and mark the wooden boards:
Using your measuring tape, measure and mark the dimensions required for each piece of the wine rack structure. Double-check your measurements to ensure accuracy.
Use a saw to cut the boards to size:
Using a saw, carefully cut the wooden boards according to your measurements. Take your time to ensure straight and accurate cuts.
Smooth the edges with sandpaper:
After cutting the wooden boards, use sandpaper to smooth out any rough edges or splinters. This will prevent any injuries and enhance the overall appearance of your wine rack.
Step 3: Assembling the Base
The base of your wine rack will provide stability and support for the entire structure.
Create the bottom base:
Using the cut wooden boards, assemble a rectangular base by attaching the appropriate pieces together. This will serve as the foundation of your wine rack.
Attach the side supports:
Using wood glue and/or screws, attach the vertical side supports to the corners of the base. These supports will provide stability and prevent the wine bottles from tipping over.
Secure the back support:
Attach a horizontal back support to the top part of the side supports. This will further reinforce the structure and prevent any wobbling.
Use wood glue and/or nails/screws for reinforcement:
To ensure maximum stability and durability, consider reinforcing the joints with wood glue and/or nails/screws. This will make your wine rack sturdy and long-lasting.
Step 4: Building the Shelves
Now it’s time to create the shelves where your wine bottles will rest securely.
Measure and mark the boards for shelves:
Measure and mark the wooden boards according to your desired shelf size. Take into consideration the height needed to accommodate your wine bottles.
Attach the shelf supports to the sides:
Using wood glue and screws, attach the shelf supports vertically to the inside of the side supports. These supports will hold the shelves in place.
Secure the shelves to the supports:
Place the wooden boards you measured earlier on top of the shelf supports and attach them securely using wood glue and/or screws. Ensure that they are level and evenly spaced.
Ensure proper spacing between shelves:
To allow sufficient space for each wine bottle, measure and mark the desired distance between each shelf. This will prevent the bottles from touching and potentially getting damaged.
Step 5: Installing the Wine Glass Holder
To complete your wine rack, you can add a wine glass holder for added functionality and style.
Determine the design and placement of the glass holder:
Decide on the design and placement of the wine glass holder. It could be underneath the top of your wine rack or on the sides. Choose a design that suits your preferences and available space.
Measure and mark the boards for the holder:
Measure and mark the wooden boards according to the size and shape of your wine glasses. Ensure that the holder is wide enough and has enough space between the glasses to avoid potential accidents.
Attach the holder to the top of the rack:
Using screws or wood glue, attach the wine glass holder to the top part of your wine rack. Ensure that it is securely fixed and able to hold the weight of the glasses.
Ensure it can securely hold the wine glasses:
Before considering the wine rack complete, test the wine glass holder to ensure that it can securely hold and support your wine glasses without any wobbling or instability.
Step 6: Adding Finishing Touches
To give your wine rack an appealing and professional finish, pay attention to the following steps.
Sand the entire wine rack to remove any rough spots:
Carefully sand the entire surface of your wine rack using sandpaper. This will remove any rough spots, make it smooth, and prepare it for staining or painting.
Apply stain or paint for desired aesthetics:
For a natural and rustic look, consider applying a wood stain that matches your kitchen decor. Alternatively, you can add a splash of color by painting your wine rack. Apply multiple coats for a more vibrant finish.
Allow sufficient drying time:
After applying stain or paint, allow sufficient drying time before handling or mounting the wine rack. Check the instructions on the stain or paint can for recommended drying times.
Step 7: Mounting the Wine Rack
With your wine rack complete, it’s time to securely mount it on your kitchen wall.
Choose suitable mounting hardware:
Select appropriate screws or nails for the mounting process. Consider the weight and stability of your wine rack to determine the best hardware.
Locate wall studs or use drywall anchors:
To ensure maximum stability, locate wall studs using a stud finder. If studs are not available in your desired location, use drywall anchors to provide extra support.
Level the rack and mark the mounting points:
Using a level, ensure that your wine rack is straight and level. Mark the mounting points on the wall based on the measurements of your wine rack.
Secure the rack to the wall using screws or nails:
Drill pilot holes at the marked mounting points, then attach your wine rack to the wall using screws or nails. Make sure it is securely fastened and doesn’t wobble.
Step 8: Organizing and Stocking the Wine Rack
Now that your wine rack is securely mounted, it’s time to organize and stock your wine collection.
Group wines by type or preference:
Organize your wine bottles based on their type, region, or your personal preference. This will make it easier to locate specific bottles when needed.
Consider using labels or tags for easy identification:
To further simplify wine selection, consider using labels or tags to identify each bottle. This will save you time and prevent any accidental mix-ups.
Stock the bottles in the rack:
Carefully place your wine bottles on the shelves, ensuring they are stable and secure. Take care not to overcrowd the rack, as this can lead to bottle breakage.
Ensure proper storage conditions (temperature and humidity):
To protect your wine, ensure that the storage location provides the proper temperature and humidity levels. Keep the wine rack away from direct sunlight or sources of heat to maintain the quality of your wines.
Step 10: Expanding or Customizing the Wine Rack
If you find that your wine collection continues to grow, or if you have specific bottle sizes that require more space, you can consider expanding or customizing your wine rack.
Determine if additional storage capacity is needed:
Assess your wine storage needs and determine if you need additional space to accommodate more bottles.
Consider adding a second rack or extending the existing one:
If space allows, you can add a second wine rack adjacent to the existing one. Alternatively, you can extend the existing rack by adding more shelves.
Modify the design to accommodate specific wine bottle sizes:
If you have unique or larger wine bottle sizes, modify the dimensions of your wine rack to properly accommodate them. Ensure that the new design is stable and secure.
By following these comprehensive steps, you’ll be able to build your own DIY wine rack for your kitchen. Not only will it provide a stylish storage solution for your wine collection, but it will also showcase your creativity and craftsmanship. Cheers to enjoying your favorite wines in a beautifully crafted wine rack that you made with your own hands!