So you’ve decided to add a DIY outdoor fire pit to your backyard, but you’re not quite sure where to start? Look no further! In this article, we will walk you through the simple and straightforward steps for creating your very own outdoor haven for relaxation and warmth. From gathering the necessary materials to safely constructing your fire pit, we’ve got you covered. So grab your tools and get ready to embark on this exciting and rewarding project that will enhance your outdoor space and provide countless memorable evenings spent around the crackling flames. Let’s get started!
Choosing the Location
When building a DIY outdoor fire pit, the first step is to carefully choose the location. There are several factors to consider in order to ensure a safe and enjoyable fire pit experience.
Consider the safety
Safety should always be the top priority when selecting a location for your fire pit. Choose an area away from any flammable objects such as trees, bushes, or buildings. It’s also essential to ensure that the fire pit is a safe distance from your home and any other structures.
Check local regulations
Before you start building your fire pit, it’s important to check with your local authorities to ensure you comply with any regulations or permits required. Some areas may have restrictions on fire pits or specific guidelines you need to follow. By doing your research, you can avoid any unnecessary fines or setbacks.
Choose an open area
Opt for an open area with plenty of space around the fire pit. This will prevent any accidental fires from spreading and provide enough room for people to gather comfortably. Open spaces also allow for better airflow, which can help keep the fire burning nicely.
Consider wind direction
Wind can greatly affect the functionality and safety of your fire pit. You want to choose a location where the prevailing wind direction will blow the smoke away from your seating area. Nobody wants to be continuously engulfed in smoke while enjoying a cozy fire!
Mark the location
Once you’ve found the perfect spot, mark the location where you plan to build your fire pit. You can use spray paint or stakes and string to clearly outline the area. This will help ensure that you have a clear vision of where the fire pit will be and make the construction process more efficient.
Gathering the Materials
Now that you’ve chosen the location, it’s time to gather all the necessary materials for building your DIY outdoor fire pit. Here’s a list of items you’ll need:
Fire pit kit
A fire pit kit contains all the essential components, including a metal ring, grate, and sometimes a spark screen. It provides a convenient and efficient way to build a fire pit without having to source all the materials individually.
Bricks or stone
You’ll need bricks or stones to create the walls of your fire pit. These materials should be fire-resistant and able to withstand high temperatures.
Gravel or sand
Gravel or sand will be used as the base for your fire pit. This helps with drainage and prevents any potential fire hazards.
Shovel
A shovel is essential for digging the pit and moving materials during the construction process. Opt for a sturdy shovel that can handle the job effectively.
Level
Using a level ensures that your fire pit is even and balanced. This is important not only for aesthetic purposes but also for the proper functionality of your fire pit.
Tape measure
A tape measure will come in handy when measuring out the dimensions of your fire pit and ensuring accurate placement of the materials.
Preparing the Site
With all your materials gathered, it’s time to prepare the site where your fire pit will be built. Follow these steps to ready the area for construction.
Clear the area
Start by clearing the chosen area of any debris, leaves, or vegetation. This will provide a clean and safe working space for building your fire pit.
Dig the pit
Using your shovel, dig a hole in the center of the cleared area. The size of the pit will depend on the dimensions of the fire pit kit or the desired size of your fire pit.
Level the ground
Before proceeding, ensure that the ground is level and even. Use a level to check for any unevenness and adjust as necessary. A level ground will ensure that your fire pit is stable and safe.
Lay the base
Fill the bottom of the pit with a layer of gravel or sand. This will create a stable foundation and aid in proper drainage. Spread the material evenly, making sure to cover the entire bottom of the pit.
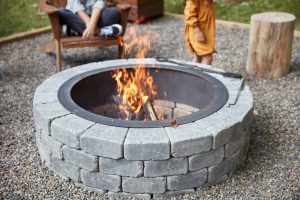
Building the Fire Pit
Now comes the exciting part – building the fire pit itself! Follow these steps to construct a sturdy and functional fire pit.
Arrange the first layer of bricks
Take your bricks or stones and arrange them in a circle around the edge of the pit. Make sure the bricks are tightly fitted together to create a solid base.
Check for levelness
Use a level to ensure that the first layer of bricks is level and even. Adjust as necessary by adding or removing some of the gravel or sand underneath the bricks.
Continue building the wall
Continue stacking bricks on top of each other until you reach the desired height for your fire pit. Remember to leave an opening for people to access the fire pit comfortably.
Fill gaps with sand
As you build the wall, you may encounter gaps between the bricks. Fill these gaps with sand to stabilize the structure and prevent any shifting.
Create the fire pit bowl
If your fire pit kit includes a metal ring, place it inside the brick wall, resting it on the top layer of bricks. This ring will serve as the bowl for your fire pit. Make sure it is seated securely.
Adding a Grate or Grill
To take your fire pit to the next level, consider adding a grate or grill for cooking purposes. Here’s how you can do it:
Choose a grate or grill
Select a grate or grill that suits your preferences and fits the dimensions of your fire pit. There is a variety of options available, ranging from simple grates for roasting marshmallows to more elaborate grills for cooking meals.
Measure and place support bricks
Measure the diameter of your grate or grill and mark the appropriate spots on the top layer of bricks. Place support bricks at these markings to create a stable platform for the grate or grill.
Place the grate or grill
With the support bricks in place, carefully position and secure the grate or grill on top. Make sure it is level and well-supported to ensure safe and efficient cooking.
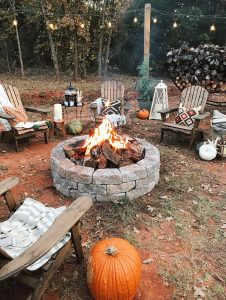
Adding Finishing Touches
Now that your fire pit is built and functional, it’s time to add some aesthetic touches to enhance its appearance and create a welcoming atmosphere.
Add a decorative border
Consider adding a decorative border around the top of the brick wall. This can be done using different types of stones, tiles, or even larger rocks. The border will add a visually appealing element to your fire pit.
Apply a top layer
To give your fire pit a polished look, you can apply a top layer of fire-resistant paint or sealant. This will help protect the bricks from weathering and make cleaning easier.
Consider a seating area
Create a cozy seating area around your fire pit by adding comfortable outdoor chairs or benches. You can also incorporate side tables for drinks and snacks. A well-designed seating area will encourage friends and family to gather and enjoy the warmth and ambiance of the fire pit.
Adding Safety Features
While fire pits provide a great way to enjoy the outdoors, it’s crucial to prioritize safety. Here are some safety features you can add to your fire pit.
Install a fire ring
A fire ring is a metal ring that surrounds the fire pit and helps contain the flames. This can prevent any accidental spreading of the fire and provide an added layer of safety.
Add a spark screen
A spark screen is a mesh cover that fits over the top of the fire pit. It prevents sparks and embers from flying out, reducing the risk of accidental fires and injuries. Always use a spark screen when the fire pit is in use.
Install a fire extinguisher
Having a fire extinguisher nearby is a critical safety measure. In the event of an emergency, you can quickly and effectively put out any flames. Make sure to familiarize yourself with its usage beforehand.
Testing and Maintenance
Before inviting friends and family over for a cozy bonfire, it’s important to test your fire pit and establish a routine for maintenance.
Test the fire pit
Once your fire pit is fully constructed, start a small fire to ensure everything is working correctly. Observe the flames, the airflow, and any potential issues. Make adjustments as needed before using the fire pit on a larger scale.
Regularly clean the fire pit
To keep your fire pit in good condition and prevent any hazards, it’s important to clean it regularly. Remove ash and debris after each use, and periodically scrub the bricks or stones to prevent buildup. This will help maintain a clean and functional fire pit.
Maintain the area around the fire pit
In addition to cleaning the fire pit itself, it’s also essential to maintain the surrounding area. Clear away any leaves or flammable materials that may have accumulated, and ensure there is a safe distance between the fire pit and any vegetation.
Enjoying the Fire Pit
Finally, it’s time to sit back, relax, and enjoy the fruits of your labor! Here are some tips for making the most of your fire pit.
Gather friends and family
Invite your loved ones over to enjoy the warmth and ambiance of your outdoor fire pit. Whether it’s for roasting marshmallows, cooking meals, or simply sharing stories, a fire pit creates a wonderful gathering place.
Follow fire safety guidelines
While enjoying your fire pit, always prioritize safety. Ensure that there is adult supervision, especially if there are young children around. Keep a close eye on the fire and extinguish it completely before leaving the area. It’s also important to follow any local fire safety guidelines or restrictions.
Enjoy the warmth and ambiance
Sit back, relax, and soak in the warmth and ambiance of your DIY outdoor fire pit. Whether you’re cuddling up with a blanket, stargazing, or having deep conversations, a fire pit adds a touch of magic to any outdoor setting. Embrace the tranquility and beauty it brings to your backyard.
By following these comprehensive steps, you can build your very own DIY outdoor fire pit and create a cozy gathering space for friends and family to enjoy. Remember to prioritize safety, follow local regulations, and regularly maintain your fire pit to ensure a long-lasting and enjoyable experience. So go ahead and start building, and get ready to make lasting memories around your new fire pit!