Are you looking to refresh the look of your home? If so, you may be considering a DIY wall painting project. Painting your own walls can be a fun and rewarding task, but it’s important to follow some best practices to ensure a successful outcome. From prepping the surface to choosing the perfect color, this article will guide you through the essential steps to achieve a professional-looking result. So grab your paint roller and get ready to transform your space with these key tips and tricks!
Preparing for the Project
Cleaning the walls
Before you can start painting, it’s important to clean the walls thoroughly. Dust, dirt, and grime can prevent the paint from adhering properly, resulting in an uneven finish. Use a mild detergent mixed with water and a sponge or soft cloth to clean the walls. Make sure to remove any grease or stains as well.
Removing old paint or wallpaper
If your walls have old paint or wallpaper, you’ll need to remove them before painting. Use a scraper or putty knife to gently peel off the old paint or wallpaper. If necessary, you can also use a chemical stripper to help loosen the paint or wallpaper. Once removed, make sure to sand the walls to create a smooth surface for painting.
Repairing any damages
Before you can paint your walls, it’s important to repair any damages such as cracks, holes, or dents. Use a putty knife to apply a patching compound or spackle to fill in the cracks or holes. Smooth it out with the putty knife and let it dry completely. Once dry, sand the patched areas to ensure a seamless finish.
Choosing the Right Colours
Consider the room’s purpose
When choosing paint colors, consider the purpose of the room. Different colors can evoke different moods and emotions. For example, cool colors like blues and greens are often used in bedrooms to create a calming and relaxing atmosphere, while warm colors like reds and yellows can create a vibrant and energetic feel in living rooms or dining areas.
Assess the lighting conditions
The lighting in a room can greatly affect how colors appear. Natural daylight may make colors appear differently than artificial lighting. Take into account the direction and intensity of light in the room. If the room receives a lot of natural light, you may want to consider lighter shades to prevent the room from feeling too bright. Similarly, if the room has limited natural light, you may want to choose warmer, brighter colors to add warmth and dimension.
Think about the color psychology
Colors have the power to affect our mood and emotions. It’s important to consider the psychological effects of different colors when selecting paint for your walls. For example, blues and greens are often associated with calmness and relaxation, while yellows and oranges can promote energy and happiness. Think about how you want the room to feel and choose colors that align with that vision.
Testing the Colors
Get paint samples
Before committing to a color, it’s a good idea to get paint samples to test on your walls. Many paint stores offer small sample containers that you can take home and try out. This allows you to see how the color looks in your particular space and lighting conditions before making a final decision.
Apply the samples on the walls
Once you have your paint samples, apply them to the walls in the room you’re planning to paint. Use a small brush or roller to create a swatch of each color. Apply the paint in a few different areas to see how it looks against different wall surfaces and lighting.
Evaluate the colors in different lighting
After applying the paint samples, take the time to evaluate how they look in different lighting conditions. Observe the colors during different times of day and under both natural and artificial light sources. Take note of any changes in the colors’ appearance and consider how they make you feel in the space.
Gathering the Right Tools and Materials
Paintbrushes
To ensure a smooth and professional-looking finish, it’s important to choose the right paintbrushes for your project. Different brush sizes and materials are suitable for different surfaces and paint types. Synthetic brushes are ideal for latex paints, while natural bristle brushes work well with oil-based paints.
Rollers
Rollers are essential for painting larger surfaces, such as walls and ceilings. Choose a roller with the appropriate nap, or thickness, for your wall texture. Rougher textures will require thicker nap rollers, while smoother surfaces can be painted with thinner nap rollers.
Drop cloths
Protect your floors and furniture by laying down drop cloths before you start painting. This will prevent any paint drips or spills from damaging your belongings. Disposable plastic drop cloths are convenient and easy to clean up, while canvas drop cloths offer more durability and can be reused for future painting projects.
Painter’s tape
Painter’s tape is crucial for achieving clean and precise lines. Use painter’s tape to mask off areas you don’t want to paint, such as baseboards, trim, and fixtures. Make sure to press the edges of the tape firmly to prevent any paint bleeding.
Primer
Applying a primer before painting can help improve the adherence of the paint and provide a more even finish. Choose a primer that is suitable for your wall surface and the type of paint you’ll be using. Apply the primer with a brush or roller, following the manufacturer’s instructions.
Paint trays
Paint trays are used to hold the paint as you work. Choose a tray that is large enough to accommodate your roller or brush. Disposable paint tray liners are available and can make cleanup easier.
Sandpaper
Sandpaper is essential for preparing the walls before painting. Use sandpaper to smooth out any rough patches or imperfections, and to create a clean surface for the paint to adhere to. Choose the appropriate grit for your specific needs.
Putty knife
A putty knife is useful for applying patching compound or spackle to repair any cracks or holes in the walls. It can also be used for scraping off old paint or wallpaper.
Extension pole
An extension pole can be attached to your roller to reach high or difficult-to-reach areas, such as tall walls or ceilings. This will save you from having to use a ladder or step stool, making your painting project safer and more efficient.

Preparing the Room
Remove furniture and decorations
Before you start painting, it’s important to remove furniture and decorations from the room, or move them to the center of the room and cover them with plastic or drop cloths. This will protect your belongings from any paint splatters or spills.
Cover the floors and furniture
To protect your floors and furniture from paint drips or spills, cover them with drop cloths or plastic sheets. Secure the coverings in place with painter’s tape to ensure they stay in place during the painting process.
Protect the surrounding areas with tape
Use painter’s tape to mask off areas that you don’t want to be painted, such as baseboards, trim, or fixtures. Make sure to press the edges of the tape firmly to create a clean and straight line.
Preparing the Walls
Clean the walls
Before painting, it’s important to clean the walls to ensure proper paint adherence. Use a mild detergent mixed with water and a sponge or soft cloth to scrub away any dust, dirt, or grease. Rinse the walls with clean water and allow them to dry completely before moving on to the next step.
Fill cracks and holes
Inspect the walls for any cracks, holes, or dents. Use a putty knife to apply a patching compound or spackle to fill in these imperfections. Smooth out the compound and let it dry completely. Once dry, sand the patched areas until they are smooth and level with the rest of the wall surface.
Sand the surfaces
To create a smooth and even surface for painting, it’s important to sand the walls. Use sandpaper to gently sand the walls in a circular or back-and-forth motion. This will help remove any rough patches or bumps and create a clean canvas for your paint.
Priming the Walls
Choose the appropriate primer
Select a primer that is suitable for your wall surface and the type of paint you’ll be using. Primer can help improve the adherence of the paint and create a more even finish. Apply the primer with a brush or roller, following the manufacturer’s instructions.
Apply the primer
Using a brush or roller, apply the primer evenly to the walls. Start at the top and work your way down, making sure to cover the entire surface. Take care to blend the edges of the primer with the surrounding areas for a seamless finish.
Allow for drying time
Allow the primer to dry completely before applying the paint. Drying times can vary depending on the type of primer and environmental conditions. Follow the manufacturer’s instructions for recommended drying times.
Painting Techniques
Cutting in the edges
Before using a roller, it’s important to cut in the edges using a paintbrush. This involves carefully painting along the edges of the walls, around trim, and near the ceiling or corners. Take your time and use a steady hand to create clean and straight lines.
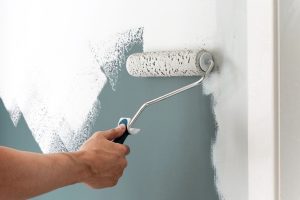
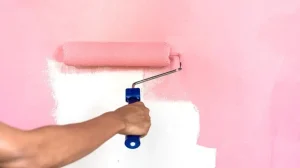
Using a roller
Once you have cut in the edges, you can use a roller to paint the larger areas of the walls. Load the roller evenly with paint and apply it to the walls in a “W” or “M” motion to ensure even coverage. Work in small sections and overlap each stroke slightly to avoid leaving streaks.
Applying multiple coats
In most cases, one coat of paint may not be enough to achieve the desired finish. Allow the first coat to dry completely before applying additional coats. This will help create a more even and vibrant color. Follow the manufacturer’s instructions for recommended drying times between coats.
Creating texture
If you want to add texture to your walls, there are several techniques you can try. One popular method is to use a textured roller, which creates patterns or designs as you roll it onto the walls. Another option is to use a sponge or rag to dab or stipple the paint onto the walls, creating a unique textural effect.
Cleaning Up
Properly dispose of paint cans and materials
After you have finished painting, it’s important to properly dispose of any leftover paint cans and materials. Check with your local waste management facility for guidelines on how to dispose of these items responsibly. Avoid pouring paint down the drain or putting it in the regular trash.
Clean brushes and rollers
Clean your brushes and rollers thoroughly immediately after painting to ensure they can be reused in the future. Use warm water and mild soap to clean latex paint from brushes and rollers. For oil-based paint, use a paint thinner or solvent. Rinse the equipment thoroughly and allow it to dry completely before storing.
Remove painter’s tape
Once the paint has dried, carefully remove the painter’s tape from the walls. Pull the tape away from the wall at a 45-degree angle to avoid peeling off any paint. Inspect the edges for any touch-ups that may be needed.
Final Touches and Inspection
Review the painted walls
After the paint has dried completely, take some time to review the painted walls. Step back and observe the overall appearance and assess if the desired look has been achieved. Check for any areas that may require touch-ups or further attention.
Touch up any mistakes or imperfections
If you notice any mistakes or imperfections, take the time to touch up those areas. Use a small brush or roller to carefully paint over any blemishes or uneven areas. Take your time and ensure the paint matches seamlessly with the surrounding areas.
Reinstall furniture and decorations
Once you are satisfied with the painted walls and any necessary touch-ups, you can begin to reinstall the furniture and decorations. Take care when moving items back into the room to avoid damaging the freshly painted walls.
By following these best practices for DIY wall painting and color selection, you can achieve professional-looking results and create a space you’ll love. Remember to take your time, gather the right tools and materials, and consider the overall purpose and lighting of the room when choosing your colors. Happy painting!