Have you ever wanted to add a personal touch to your bedroom decor? Building a custom headboard for your bed can be a fun and rewarding DIY project that allows you to showcase your creativity. In this article, we will guide you through the steps involved in creating a unique and customized headboard that perfectly suits your style and complements your bedroom. From selecting the materials to adding those finishing touches, we’ve got you covered. So, grab your tools and let’s get started on creating the headboard of your dreams!
Choosing the Design
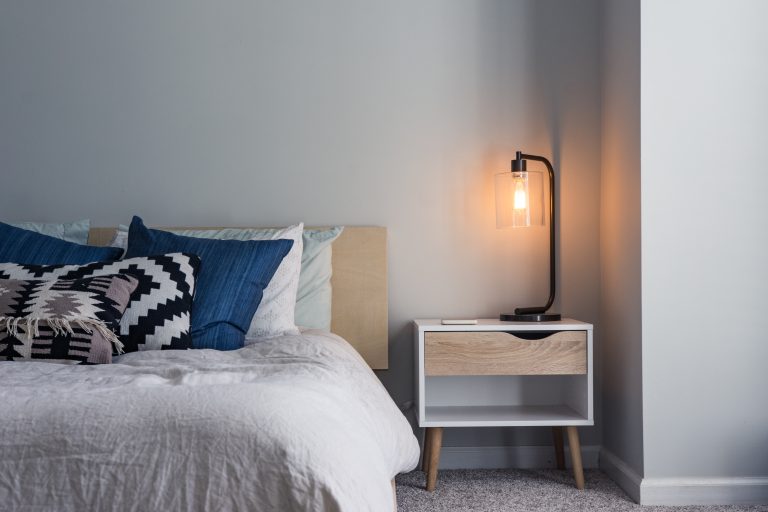
When it comes to building a custom headboard for your bed, the first step is to choose the design that you want. Consider the overall style and shape of your bedroom, as well as your personal preferences. Do you want something sleek and modern, or do you prefer a more traditional and ornate look? Take some time to browse through different headboard designs and find one that speaks to you.
Once you have a design in mind, the next step is to measure the width and height of your bed. This will ensure that your headboard fits perfectly and complements the size of your bed. Use a tape measure to measure the width of the mattress and add a few extra inches on each side to account for any overhang you desire. For the height, consider how high you want the headboard to extend above the mattress. Measure from the top of the mattress to your desired height, keeping in mind any existing furniture or wall hangings that the headboard may need to fit in with.
As you’re choosing the design, also think about the materials and color options that would work best for your project. Consider the furniture and decor in your bedroom and choose materials and colors that will coordinate well with the existing design. Whether you prefer a luxurious velvet, a rustic wood, or a chic leather, make sure to factor in these considerations as you make your decision.
Gathering the Materials and Tools
Once you have your design chosen, it’s time to gather all the materials and tools you’ll need for the project. Having everything prepared in advance will help ensure a smooth and efficient construction process.
Make a list of all the materials needed for your custom headboard. This may include plywood for the frame, upholstery foam for padding, batting for added cushioning, fabric to cover the headboard, screws or nails for assembly, adhesive for securing the foam, and any additional trim or decorative elements you may want to add. Take into account your specific design and measurements when creating this list.
In addition to the materials, compile a list of tools required for the project. Some common tools you might need include a circular saw or jigsaw for cutting the plywood, sandpaper for smoothing the edges, a staple gun for attaching fabric and batting, a drill for creating tufting holes, and a screwdriver or hammer for assembling the frame. Having all the necessary tools readily available will make the construction process much easier and more efficient.

Preparing the Work Area
Before diving into the construction of your custom headboard, it’s important to prepare the work area to ensure a safe and organized space for your project.
Start by clearing the space where you’ll be building the headboard. Remove any furniture or objects that could obstruct your movement or pose a safety hazard. It’s also a good idea to remove any rugs or carpets from the area to prevent them from getting damaged during construction.
To protect the surrounding area, lay down a drop cloth or old sheets to catch any dust or debris. This will make cleanup easier and prevent any damage to your floors or furniture. Additionally, consider using painter’s tape to protect any nearby walls or surfaces from accidental scratches or marks.
Finally, set up a workbench or table where you can assemble and work on the headboard. Make sure it’s sturdy and level, providing you with a stable surface to work on. Having a designated work area will help you stay organized and focused throughout the construction process.
Building the Frame
Now it’s time to start building the frame of your custom headboard. This will serve as the structure and support for the entire piece.
Begin by cutting the plywood to the desired dimensions based on the measurements you took earlier. Use a circular saw or jigsaw to make precise cuts, following your chosen design and sizing.
Once the plywood is cut, take some sandpaper and smooth the edges and surface of the plywood. This step will ensure a professional and polished look for your headboard. Sanding will not only remove any rough edges but also provide a smooth and even surface for the later steps of the construction process.
With the plywood prepared, it’s time to assemble the frame. You can choose to use either screws or nails, depending on your preference and the materials you’re working with. Securely attach the various pieces of plywood together, following the design you have chosen. Make sure to align all the edges and corners precisely, ensuring a sturdy and well-constructed frame.

Attaching Upholstery Foam and Batting
To add comfort and cushioning to your custom headboard, it’s important to attach upholstery foam and batting to the plywood frame.
Measure and cut the foam to fit the frame of the headboard. You can do this using a sharp utility knife or a foam cutting tool. Take your time to ensure that the foam fits snugly within the frame, without any gaps or uneven edges.
Once you have the foam cut to size, secure it to the plywood using an adhesive specifically designed for upholstery. Apply a thin layer of adhesive to the foam and press it firmly onto the plywood. Make sure to smooth out any air bubbles or wrinkles as you go. Allow the adhesive to dry completely before moving on to the next step.
Next, place a layer of batting over the foam to provide additional softness and a smooth surface for the fabric. Cut the batting to fit the plywood frame, leaving a few inches of excess on all sides. Pull the batting tightly around the frame and staple it to the back of the headboard, using a staple gun. Start at the center of each side and work your way towards the corners, ensuring a smooth and even finish. Trim any excess batting once you have stapled it securely to the back of the headboard.
Choosing and Applying Fabric
One of the most exciting parts of building a custom headboard is choosing the fabric that will bring your design to life. Consider the style, color, and pattern that will best complement your bedroom and personal taste.
Select a fabric that matches your desired style and coordinates with the overall design of your room. Whether you prefer a luxurious velvet, a durable linen, or a vibrant patterned fabric, make sure it aligns with your vision for the headboard.
Measure and cut the fabric to fit the headboard, leaving a few inches of excess on all sides for wrapping and securing. Lay the fabric flat on a clean surface and place the headboard, batting side down, on top of it. Starting from the center of each side, pull the fabric tightly around the headboard and staple it to the back. Ensure that the fabric is smooth and wrinkle-free as you go. Continue stapling towards the corners, pulling the fabric tightly to achieve a professional finish.
If you prefer a no-staple method, you can also use an adhesive specifically designed for upholstery. Apply a thin layer of adhesive to the plywood frame and press the fabric onto it, smoothing out any wrinkles or bubbles. This method may require additional drying time to ensure a secure bond.
Adding Tufting or Decorative Elements
Tufting is an elegant and timeless design element that can elevate the look of your custom headboard. Whether you choose traditional tufting, diamond tufting, or an alternative design, it’s important to plan and prepare before drilling any holes.
Decide on the placement and design of the tufting. Mark the desired locations for the tufting buttons on the front of the headboard. Use a measuring tape and pencil to ensure even spacing and alignment. Once you have marked the locations, use a drill bit appropriate for the size of your tufting buttons and create holes where the buttons will be inserted.
To attach the tufting buttons, thread a piece of string or thread through the shank of each button. Push the button through the hole from the front of the headboard, pass the string through the corresponding hole on the back, and tie it tightly to secure the button. Repeat this process for each tufting button, ensuring a tight and even tufting pattern.
For added decorative elements, consider adding trim or embellishments to enhance the design of your headboard. This could include nailhead trim, decorative buttons, or fabric piping. Attach these elements using the appropriate adhesive or by sewing them directly onto the fabric.
Finishing and Upholstering the Sides
To give your custom headboard a polished and professional look, it’s important to finish and upholster the sides.
Measure and cut fabric to fit the sides of the headboard, leaving a few inches of excess for wrapping and securing. Use a staple gun or adhesive to attach the fabric to the sides, ensuring a smooth and even finish. Start at one corner and work your way around, pulling the fabric tightly to avoid any sagging or wrinkles. Trim any excess fabric once it is securely attached.
Throughout this process, it’s important to ensure that the fabric is taut and smooth, providing a clean and finished look to your headboard.
Mounting the Headboard to the Bed
Once your custom headboard is complete, it’s time to mount it to your bedframe. The method of mounting will depend on the type of bedframe you have, so it’s important to determine the appropriate mounting method for your specific situation.
If your bedframe has built-in mounting brackets or slots, attach any necessary brackets or hooks to the headboard accordingly. Fit the headboard onto the bedframe, making sure it is level and securely attached. Follow the manufacturer’s instructions if available, and use any included hardware to ensure a secure fit.
If your bedframe does not have pre-existing mounting options, consider using anchor brackets or a French cleat system to securely mount the headboard to the wall behind the bed. Make sure to follow proper safety guidelines and consult with a professional if needed to ensure a safe and secure installation.
Optional: Adding Finishing Touches
To truly personalize your custom headboard, consider adding some finishing touches to enhance the overall design and make it uniquely yours.
One option is to paint or stain the frame of the headboard to your desired color. This can be a fun and creative way to tie in the headboard with the existing color scheme of your room or to make it stand out as a statement piece. Choose a paint or stain that is appropriate for the type of wood or material you are working with, and apply it evenly and smoothly.
Another option is to add trim or decorative elements to further enhance the design. This could include adding nailhead trim along the edges of the headboard, attaching fabric piping to create a border, or incorporating decorative buttons or studs. These finishing touches can add a touch of sophistication and uniqueness to your custom headboard.
Finally, consider applying a protective finish to the headboard to ensure its longevity and durability. Depending on the materials used and the desired outcome, you may choose to apply a clear sealant or a protective spray to safeguard the fabric and wood from stains, spills, and general wear and tear.
With these optional finishing touches, your custom headboard will truly become a masterpiece that reflects your personal style and elevates the overall aesthetic of your bedroom.