Have you been dreaming of giving your kitchen a personalized touch? Look no further! In this article, we will explore the world of DIY kitchen decor and discuss various ways in which you can incorporate your own personal style into your kitchen design. By adding small, thoughtful touches and implementing simple DIY projects, you can transform your kitchen into a space that truly reflects your personality and taste. So, get ready to unleash your creativity and let’s dive into the exciting world of DIY kitchen decor!

Painting Cabinets
Are your kitchen cabinets looking tired and outdated? Painting them can be a cost-effective and transformative solution to freshen up the look of your kitchen. Choosing the right paint color is the first step in achieving the desired outcome. You want to select a color that complements your existing kitchen decor and personal style. Consider the overall theme and color scheme of your kitchen, as well as the mood you want to create. Lighter colors can make a small kitchen appear more spacious, while darker colors can add depth and richness.
Before diving into painting your cabinets, proper preparation is key to ensure a smooth and long-lasting finish. Start by removing all hardware, including handles, knobs, and hinges. Thoroughly clean the surfaces using a degreasing agent to remove any grease, dirt, or grime. This step will help the paint adhere better to the surface. Use a sanding block to lightly sand the cabinets, creating a rough texture for the paint to grip onto. Don’t forget to wipe away any dust or debris before moving on to the next step.
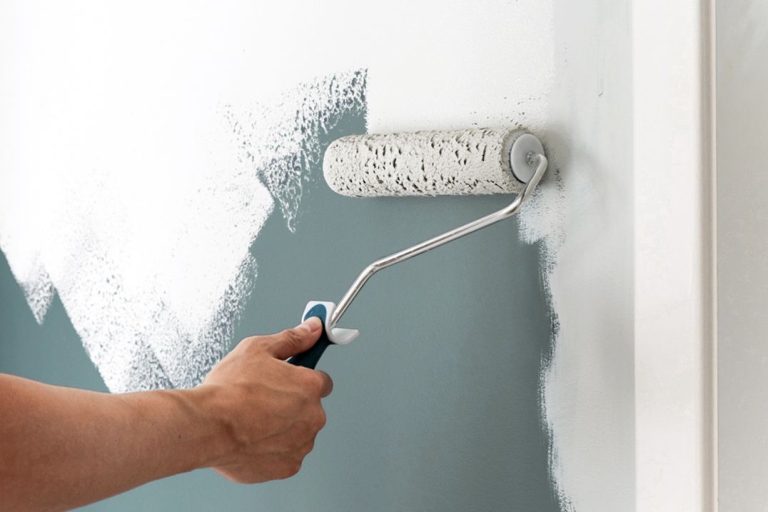
When it comes to painting techniques, there are a few options to consider. One popular method is using a brush to apply the paint. This technique allows for more control and precision, especially in smaller areas or intricate details. Another option is using a foam roller, which provides a smoother finish and can help to minimize brush strokes. Make sure to apply thin and even coats of paint, allowing sufficient drying time between each layer. If desired, a protective clear coat can be applied once the paint is fully dry to provide additional durability and longevity to your newly painted cabinets.
Creating a Backsplash
A backsplash can be a focal point in your kitchen, adding both style and functionality. When it comes to choosing the right material for a DIY backsplash, there are countless options to explore. Some popular choices include ceramic or porcelain tiles, glass tiles, stainless steel sheets, and even peel-and-stick options like vinyl or wallpaper. Consider the overall look and feel you want to achieve in your kitchen, as well as the level of maintenance and durability required for the chosen material.
Once you have selected the material, it’s time to choose a design for your backsplash. This is where you can let your creativity shine and personalize your kitchen decor. Popular design options include subway tiles arranged in a classic brick pattern, mosaic tiles with intricate patterns or images, and herringbone or chevron patterns for a modern twist. Don’t be afraid to mix and match different colors and shapes to create a unique and eye-catching backsplash.
Installation of a DIY backsplash can be a rewarding and relatively simple project. Make sure to carefully measure and plan the layout before starting. Preparing the surface by cleaning and priming, if necessary, will ensure proper adhesion. Applying the adhesive or mortar and placing the tiles one by one requires attention to detail and consistency. Once the tiles are set, allow them to cure or dry before grouting. Applying grout and wiping away any excess will bring the look of your backsplash together. Finally, sealing the grout will add an extra layer of protection and make cleaning easier.
Repurposing Mason Jars
Mason jars have become a staple in the world of DIY decor, and their versatility makes them a perfect addition to any kitchen. One popular use for mason jars is as storage containers. They can be used to store dry goods like pasta, rice, or cereal, or even as a stylish way to organize utensils, brushes, or other small kitchen items. Simply add a label or tie a ribbon around the jar to complete the look.
If you have a green thumb or simply enjoy fresh herbs, mason jars can be transformed into herb gardens. Fill the jars with soil and plant your favorite herbs, then place them in a sunny spot in your kitchen. Not only will they add a touch of greenery, but they will also provide fresh herbs for your culinary creations. Just make sure to water them regularly and trim as needed to keep them thriving.
For a unique and whimsical lighting fixture, repurpose mason jars into DIY pendant lights. Drill a small hole in the lid of the jar and thread a pendant light kit through it. Attach the lid to the jar and hang it from the ceiling. This creates a charming and rustic lighting element that adds character to your kitchen. Experiment with different colored jars or add decorative elements like ribbons or beads for an even more personalized touch.
Making Customized Tile Coasters
Tile coasters are not only functional but also an opportunity to showcase your creativity. Start by choosing the right tiles for your coasters. Ceramic tiles work well, as they are durable and easy to find in various sizes and colors. Consider the style and colors of your kitchen decor when selecting the tiles.
To add a personal touch to your coasters, you can incorporate personalized designs. One simple option is to use stencils or stickers to create patterns or words on the tiles. Alternatively, you can use acrylic paints and brushes to hand-paint intricate designs or even monograms on each coaster. Get creative and experiment with different techniques and colors to match your kitchen aesthetic.
Once your designs are complete, it’s essential to protect the coasters with a sealant. A clear waterproof sealant will help to prevent any moisture or spills from damaging the paint or the tile surface. Apply multiple thin coats of the sealant, allowing each layer to dry completely before adding the next. This will ensure a long-lasting finish and make your coasters resistant to everyday wear and tear.

Handcrafted Kitchen Art
Creating a gallery wall with DIY art is a fantastic way to add a personal touch to your kitchen decor. Start by choosing a theme or color scheme that complements your kitchen. This could be anything from food-related artwork to vintage kitchen utensils. Look for printable art online or get creative and make your own. Framed recipe cards, vintage cookbook pages, or even photographs of your favorite family recipes can make for unique and sentimental pieces of art.
Another option for handcrafted kitchen art is making personalized signs. Using wood or canvas as your base, paint or stencil kitchen-related quotes, sayings, or even your family name. You can also add decorative elements like utensils or illustrations that reflect your kitchen’s style. Hang these signs on the wall or place them on open shelves for a charming and customized touch.
If you enjoy working with stencils, consider using kitchen-themed stencils to create your own artwork. Stencils in the shape of coffee cups, fruits, vegetables, or kitchen utensils can be used to create beautiful and intricate designs on canvas or wood. Use different colors and layering techniques to add depth and dimension to your artwork. Whether you choose to create a single focal piece or a collection of smaller artworks, this DIY project will surely add personality to your kitchen.
Building Open Shelves
Open shelves are not only functional but also a great opportunity to display your style and personality. Before diving into this project, determine the dimensions and location of the shelves. Measure the available space and consider factors like the height and depth of the shelves, as well as the distance between each shelf. Take into account any existing cabinetry or appliances that may affect the placement of the shelves.
Choosing the right wood or material for your open shelves is crucial for both aesthetic and durability purposes. Natural wood, such as pine or oak, can bring warmth and character to your kitchen. Ensure that the wood is properly sanded and treated to protect it from moisture and wear. Alternatively, there are various options for pre-made shelves made of metal, glass, or even reclaimed materials. Consider the overall style of your kitchen and choose a material that complements your existing decor.
Installation techniques for open shelves will vary depending on the material used and the wall structure. For wooden shelves, use sturdy brackets that match your desired aesthetic. Ensure that they are securely attached to the wall studs for maximum stability. If utilizing pre-made shelves, follow the manufacturer’s instructions for installation. Once the shelves are securely in place, arrange your kitchen essentials and decorative items, creating a visually pleasing display that reflects your personal style.
Decorating with Repurposed Kitchen Tools
Repurposing antique kitchen tools as decorative pieces is a charming way to infuse your kitchen with a sense of nostalgia and history. Look for vintage kitchen tools at thrift stores, flea markets, or even within your own family’s heirlooms. Items like old-fashioned egg beaters, rolling pins, or metal canisters can be transformed into unique wall decor.
Creating a kitchen utensil display is another creative way to showcase repurposed kitchen tools. Hang a collection of vintage utensils on a pegboard or a decorative wooden board. Arrange them in an artistic or symmetrical pattern for a cohesive look. Not only will this create visual interest, but it will also provide easy access to your cooking tools.
For a more whimsical approach, consider using repurposed kitchen tools as wall art. Attach them to a large wooden board or mount them directly on the wall. Arrange them in an eye-catching pattern, ensuring that each piece is securely fastened. This DIY project will undoubtedly become a conversation starter and add a unique touch to your kitchen decor.
DIY Magnetic Spice Rack
Say goodbye to messy spice cabinets and hello to a visually appealing and organized spice display with a DIY magnetic spice rack. Start by choosing the right magnetic surface for your spice jars. Magnetic boards, metal sheets, or even the side of your refrigerator can serve as a base for your spice rack. Make sure the surface is clean and free from any residue or debris.
Organizing and labeling your spice jars is essential for easy access and identification. Transfer your spices into uniform jars or tins to create a cohesive look. Use clear labels or stickers to identify each spice. Arrange the jars on your magnetic surface, ensuring they are securely attached. For added convenience, consider organizing your spices in alphabetical order or by categories.
Creating a visually appealing spice display can be achieved by incorporating design elements like color coordination, patterns, or even illustrations. Arrange the spice jars in a way that is visually pleasing to you. Consider grouping spices of similar colors or creating a gradient effect. Adding small decorative elements like chalkboard labels, miniature spoons, or small plants can further enhance the aesthetic of your DIY magnetic spice rack.
Hand-Painted Dishware
Adding a touch of artistry to your dishware can give your kitchen a personalized and unique look. Start by choosing the right type of dishware to paint on. Porcelain or ceramic plates, bowls, or mugs work well as they provide a smooth and durable surface for your designs. Select sizes and shapes that suit your personal taste and kitchen aesthetic.
When it comes to design ideas for hand-painted dishes, the possibilities are endless. You can opt for simple and minimalist designs like geometric shapes or subtle brushstrokes. Alternatively, you can create intricate patterns, floral motifs, or even personalize each piece with names or monograms. Consider the color scheme of your kitchen and the overall look you want to achieve.
Sealing and preserving the paint on your hand-painted dishware is crucial for long-lasting results. Once your designs are complete and fully dry, apply a food-safe sealant or varnish to protect the paint from chipping or fading. Make sure to follow the manufacturer’s instructions for the sealant, including any recommended curing time. Hand-wash your hand-painted dishes to preserve the integrity of the paintwork and enjoy your personalized tableware for years to come.
Creating a Coffee Station
For coffee lovers, creating a dedicated coffee station in your kitchen can elevate your daily coffee routine and add a personal touch to your space. Repurposing a small cabinet or shelf is a great way to achieve this. Look for an unused cabinet or consider removing the doors of an existing one to create an open and accessible space. Alternatively, a small shelf mounted on the wall can serve as a stylish and compact coffee station.
Organizing coffee essentials is key to a functional and visually appealing coffee station. Start by designating specific areas for your coffee maker or espresso machine, mugs, coffee beans or grounds, and accessories like filters and stirrers. Use containers or baskets to keep everything organized and easily accessible. Consider displaying your mugs or cups in an attractive way, such as hanging them on hooks or arranging them on a decorative tray.
Adding personal touches to your coffee station can make it feel like a cozy and welcoming corner in your kitchen. Incorporate elements like framed artwork or quotes about coffee, small potted plants, or even a chalkboard or whiteboard where you can write fun or inspirational messages. Don’t forget to include a collection of your favorite coffee beans or grounds for easy selection. Enjoy the convenience and charm of your personalized coffee station every morning as you start your day.